
本記事では、VSCode の拡張機能 Remote – SSH を使用して Linux サーバに SSH 接続してファイル編集できるように設定する方法について説明しています。
環境情報
本記事では、以下バージョンにてインストールを行った結果を掲載しています。
【サーバ側】
・OS:CentOS Stream 9
【クライアント側】
OS:Windows 10
VSCode:1.92
インストール手順
それではインストールしていきましょう!
1.キーペアの作成
はじめにクライアントPCで SSH 接続に使用するキーペアを作成しておきます。
コマンドプロンプトで、ログインユーザーのホームディレクトリにある .ssh フォルダに移動してから以下コマンドを実行します。
今回はパスフレーズは設定しないので、Enter キーを2回押します。
cd c:\users\<ユーザー名>\.ssh                        # .ssh フォルダへ移動

ssh-keygen -t rsa -b 2048 -f key_vscode_remote_ssh  # キーペアを作成
実行結果
C:\Users\guest01\.ssh>ssh-keygen -t rsa -b 2048 -f key_vscode_remote_ssh
Generating public/private rsa key pair.
Enter passphrase (empty for no passphrase):
Enter same passphrase again:
Your identification has been saved in key_vscode_remote_ssh.
Your public key has been saved in key_vscode_remote_ssh.pub.
The key fingerprint is:
SHA256:lWdE2St4Znu047FyVmNIRglYEcGXlDRe+kT1FzNrhNM guest01@LOCALPC
The key's randomart image is:
+---[RSA 2048]----+
|          +BX**Bo|
|         . +oOBE*|
|          o.=o.=o|
|         ..o=o* .|
|        S  +o+.o |
|            ..=o.|
|             o.=.|
|            . =  |
|             +   |
+----[SHA256]-----+

C:\Users\guest01\.ssh>
c:\users\<ユーザー名>\.ssh
フォルダ配下に下記ファイルが生成されていると思います。
・key_vscode_remote_ssh
・key_vscode_remote_ssh.pub
2.SSH ログインユーザーの authorized_keys ファイルに公開鍵を登録
次にSSH 接続先のユーザーの
/home/xxxx/.ssh/authorized_keys(root ユーザーの場合 /root/.ssh/authorized_keys)
に公開鍵(key_vscode_remote_ssh.pub)の内容を記載しておきます。
cd ~/.ssh                       # ホームディレクトリ配下の .ssh に移動
touch authorized_keys           # ファイル準備
vi authorized_keys              # 編集

cat authorized_keys             # 確認
実行結果
[root@localhost .ssh]# cd ~/.ssh                       # ホームディレクトリ配下の .ssh に移動
[root@localhost .ssh]# touch authorized_keys
[root@localhost .ssh]#
[root@localhost .ssh]# vi authorized_keys
[root@localhost .ssh]#
[root@localhost .ssh]# cat authorized_keys
ssh-rsa AAAAB3NzaC1yc2ExxxxxxxxxxxxxxxxxxxxxxxxxxxxxxxxxxxxxxxxxxxxxxxxxxxxxxxxxxxxxxxxxxxxxxxxxxxxxxxxxxxxxxxxxxxxxxxxxxxxxxxxxxxxxxxxxxxxxxxxxxxxxxxxxxxxxxxxxxxxxxxxxxxxxxxxxxxxxxxxxxxxxxxxxxxxxxxxxxxxxxxxxxxxxxxxxxxxxxxxxxxxxxxxxxxxxxxxxxxxxxxxxxxxxxxxxxxxxxxxxxxxxxxxxxxxxxxxxxxxxxxxxxxxxxxxxxxxxxxxxxxxxxxxxxxxxxxxxxxxxxxxxxxxxxxxxxxxxxxxxxxxxxxxxxxxxxxxxxwE2qbK1+VnW+oB/Bygfnh guest01@LOCALPC

[root@localhost .ssh]#
3.クライアントPCからサーバに SSH 接続を試す
作成したキーペアを使い SSH(鍵認証) でサーバに接続してみます。
Windows の場合は、powershell もしくは コマンドプロンプト から実行します。
# ssh <ユーザーID>@<ホスト名> -i <キー情報パス(秘密鍵)>
ssh root@192.168.56.88 -i C:\Users\guest01\.ssh\key_vscode_remote_ssh
実行結果
c:\>ssh root@192.168.56.88 -i C:\Users\okada\.ssh\key_vscode_remote_ssh
The authenticity of host '192.168.56.88 (192.168.56.88)' can't be established.
ECDSA key fingerprint is SHA256:bwX1OFsImFxxxxxxxxxxxxxxxxxxxxjUti9Bjw7Mji8.
Are you sure you want to continue connecting (yes/no/[fingerprint])? yes
Warning: Permanently added '192.168.56.88' (ECDSA) to the list of known hosts.
Last login: Sat Aug 31 13:56:39 2024 from 192.168.56.1
[root@localhost ~]#
初回接続時は、ホスト情報の確認を求められるので yes を入力し enter を押します。
接続先である linux サーバのプロンプト([root@localhost ~]#)が表示されていれば SSH 接続成功です。
続けてssh の接続を簡単に行えるように「c:\users\<ユーザー名>\.ssh\config」ファイルに接続情報を追加していきます。
Host SSH_CentOS9_88
    HostName 192.168.56.88
    User root
    Port 22
    IdentityFile C:\Users\guest01\.ssh\key_vscode_remote_ssh
上記内容を config ファイル内に記載したら先ほどとは違う方法で サーバに SSH 接続をしてみます。
# ssh <config ファイルに記載した profile 名>
ssh SSH_CentOS9_88
実行結果
c:\>ssh SSH_CentOS9_88
Last login: Sat Aug 31 14:08:20 2024 from 192.168.56.1
[root@localhost ~]#
[root@localhost ~]#
先ほど同様に、接続先である linux サーバのプロンプト([root@localhost ~]#)が表示されていれば SSH 接続成功です。
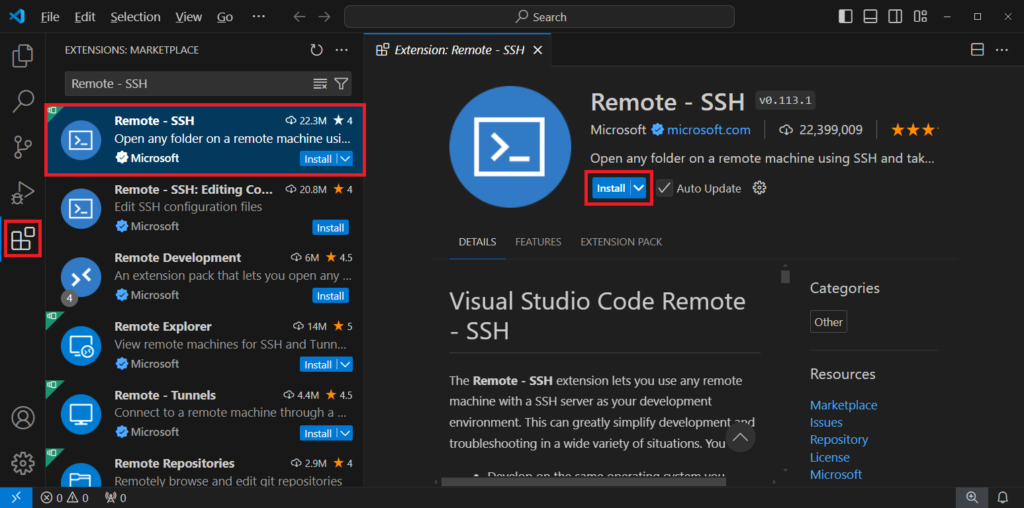
4.VSCode の拡張機能 Remote – SSH をインストール
VSCode の拡張機能で Remote – SSH を探し、インストールします。
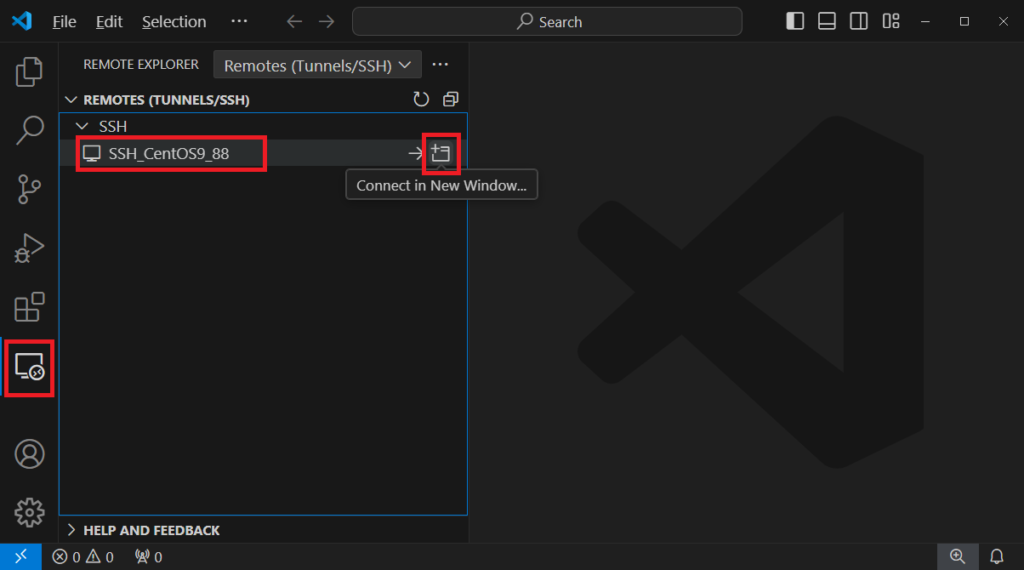
5.VSCode からサーバへ SSH 接続
インストールが完了すると左側のメニューに Remote Explorer というアイコンが追加されます。
クリックすると REMOTES > SSH > SSH_CentOS9_88 と表示されており手順3.で「c:\users\<ユーザー名>\.ssh\config」に設定した接続名が表示されていると思います。
該当行の Connect in New Window… をクリックします。
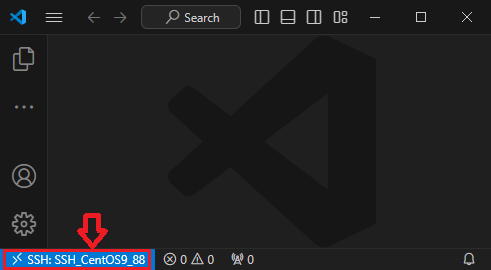
すると、新規ウィンドウでサーバへ接続された状態の VSCode が立ち上がります。
※初回接続時は、サーバ側に VSCode Server が導入されるため、数分時間がかかると思います。
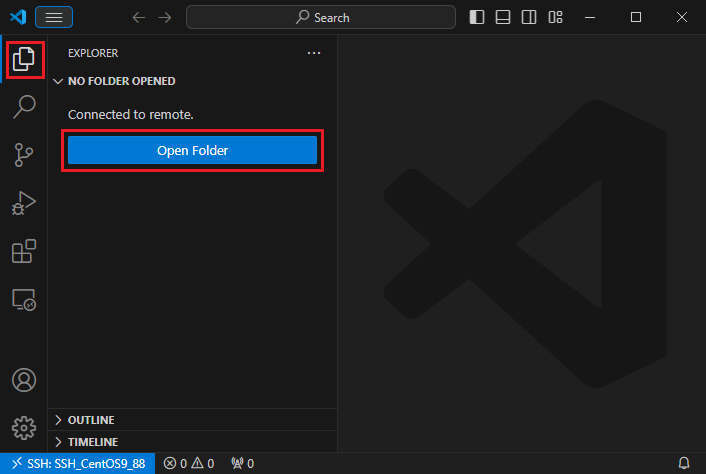
画面左下に、接続先の接続名が表示されていることが確認できます。
SSH でサーバに接続した状態になったので、Explorer で Open Folder をクリックします。
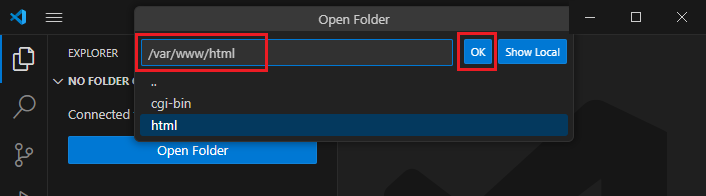
開くフォルダパスを入力します。
ここでは「/var/www/html」を開くことにします。
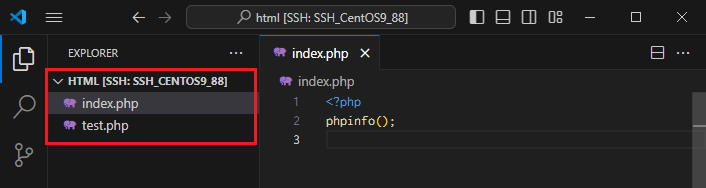
指定したフォルダパス配下のサーバ上のファイルが表示されました。
この状態で編集した内容は、サーバ上のファイルに直接反映されます。
インストールと接続確認は以上です。
おまけ
サーバ側(SSH 接続先)に導入された VS Code server を確認してみる
Remode – SSH でサーバ側に初回接続時に配置されたファイルを見てみます。
cd ~                    # ユーザーのホームディレクトリへ移動
ls -al                  # ホームディレクトリ配下のファイル確認
# [check] => ホームディレクトリ配下にファイルが配置されていることがわかる

du -sh .vscode-server   # .vscode-server 配下のすべての合計容量を表示
実行結果
[root@localhost ~]# cd ~                    # ユーザーのホームディレクトリへ移動
[root@localhost ~]#
[root@localhost ~]# ls -al                  # ホームディレクトリ配下のファイル確認
合計 40
dr-xr-x---.  6 root root 4096  9月  1 14:27 .
dr-xr-xr-x. 18 root root  235  8月 11 16:45 ..
-rw-------.  1 root root 4792  9月  1 14:32 .bash_history
-rw-r--r--.  1 root root   18  8月 10  2021 .bash_logout
-rw-r--r--.  1 root root  141  8月 10  2021 .bash_profile
-rw-r--r--.  1 root root  429  8月 10  2021 .bashrc
drwxr-xr-x.  3 root root   23  8月 31 14:18 .cache
drwx------.  3 root root   20  9月  1 14:27 .config
-rw-r--r--.  1 root root  100  8月 10  2021 .cshrc
-rw-------.  1 root root   20  8月 25 11:30 .lesshst
drwx------.  2 root root   29  8月 31 13:41 .ssh
-rw-r--r--.  1 root root  129  8月 10  2021 .tcshrc
drwxr-xr-x.  5 root root  157  9月  1 14:07 .vscode-server
-rw-------.  1 root root 1014  8月 11 16:50 anaconda-ks.cfg
[root@localhost ~]# # [check] => ホームディレクトリ配下にファイルが配置されていることがわかる
[root@localhost ~]#
[root@localhost ~]# du -sh .vscode-server   # .vscode-server 配下のすべての合計容量を表示
194M    .vscode-server
[root@localhost ~]#
私の環境では、サーバ側に約200MB 程のファイルが配置されていました。
プロセスも確認してみます。
ps aux | grep vscode-server # VS Code server のプロセス確認実行結果
[root@localhost ~]# ps aux | grep vscode-server # VS Code server のプロセス確認
root        1581  0.0  0.0   5300  3200 ?        S    14:05   0:00 sh /root/.vscode-server/cli/servers/Stable-fee1edb8d6d72a0ddff41e5f71a671c23ed924b9/server/bin/code-server --connection-token=remotessh --accept-server-license-terms --start-server --enable-remote-auto-shutdown --socket-path=/tmp/code-82cfb90e-c196-431c-bf1e-739289c68602
root        1585  0.8  2.9 1337104 111240 ?      Sl   14:05   0:15 /root/.vscode-server/cli/servers/Stable-fee1edb8d6d72a0ddff41e5f71a671c23ed924b9/server/node /root/.vscode-server/cli/servers/Stable-fee1edb8d6d72a0ddff41e5f71a671c23ed924b9/server/out/server-main.js --connection-token=remotessh --accept-server-license-terms --start-server --enable-remote-auto-shutdown --socket-path=/tmp/code-82cfb90e-c196-431c-bf1e-739289c68602
root        1629  0.0  1.7 1131756 63740 ?       Sl   14:05   0:01 /root/.vscode-server/cli/servers/Stable-fee1edb8d6d72a0ddff41e5f71a671c23ed924b9/server/node /root/.vscode-server/cli/servers/Stable-fee1edb8d6d72a0ddff41e5f71a671c23ed924b9/server/out/bootstrap-fork --type=ptyHost --logsPath /root/.vscode-server/data/logs/20240901T140515
root        1726  0.1  0.4  32164 17880 ?        Sl   14:07   0:02 /root/.vscode-server/code-fee1edb8d6d72a0ddff41e5f71a671c23ed924b9 command-shell --cli-data-dir /root/.vscode-server/cli --parent-process-id 1692 --on-port --on-host=127.0.0.1
root        1755  0.6  2.6 1334100 101152 ?      Sl   14:07   0:11 /root/.vscode-server/cli/servers/Stable-fee1edb8d6d72a0ddff41e5f71a671c23ed924b9/server/node --dns-result-order=ipv4first /root/.vscode-server/cli/servers/Stable-fee1edb8d6d72a0ddff41e5f71a671c23ed924b9/server/out/bootstrap-fork --type=extensionHost --transformURIs --useHostProxy=false
root        1766  0.0  1.4 1240372 54328 ?       Sl   14:07   0:01 /root/.vscode-server/cli/servers/Stable-fee1edb8d6d72a0ddff41e5f71a671c23ed924b9/server/node /root/.vscode-server/cli/servers/Stable-fee1edb8d6d72a0ddff41e5f71a671c23ed924b9/server/out/bootstrap-fork --type=fileWatcher
root       39324  0.0  0.0   4596  2304 pts/0    S+   14:35   0:00 grep --color=auto vscode-server
[root@localhost ~]#
vscode-server としてプロセスも確認できました。
まとめ
本記事では、VS Code エディタの拡張機能 Remote – SSH のインストールとサーバ接続までの設定を行いました。
リモート環境のソースを VS Code の UI で編集できるので VS Code に慣れている方にとっては非常に助かる機能かと思います。
ただしサーバ上のリソース消費も発生するため、導入時は影響等を確認しておくと安心かと思います。
お読みいただきありがとうございました。